Assistant Workflow Editor
Configure the LLM pipeline that powers your assistant's responses.
What is the embedded workflow?
Every assistant has its own private embedded workflow — an LLM pipeline that processes incoming chat messages and generates responses. This workflow:
- Is created from within the assistant editor (not the Workflows section)
- Does not appear in the Workflows dashboard (which only lists standalone task workflows)
- Is the engine behind every chat conversation the assistant has
Getting to the editor
- Open an assistant at
/assistants-config/{id} - In the workflow section, click + Add workflow (if no workflow exists) — this creates one automatically
- Or click an existing workflow card to open it
The editor opens at /assistants-config/{id}/workflow/{workflowId}.
Canvas overview
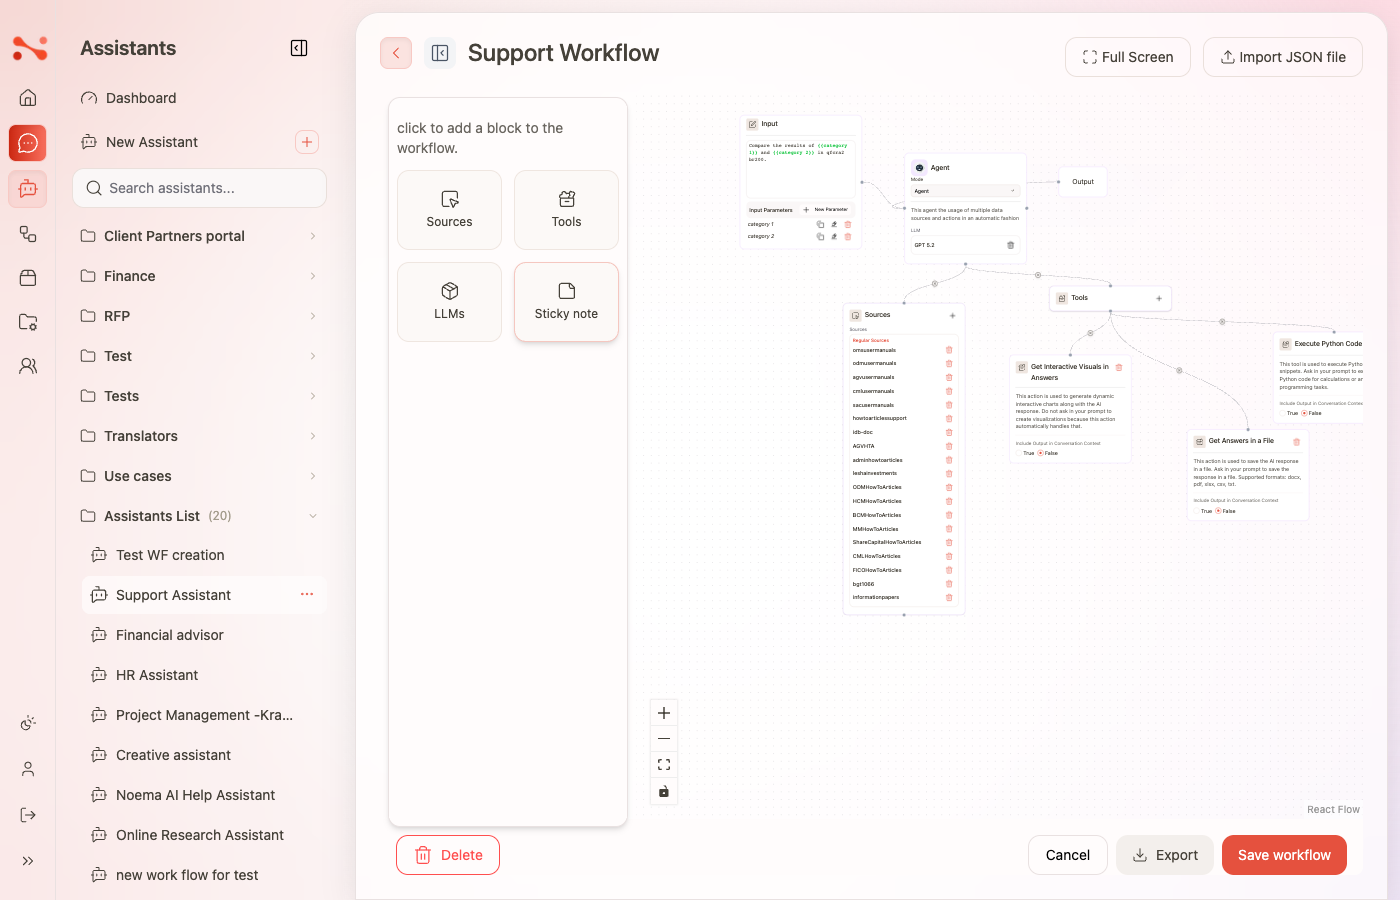
The canvas has three fixed nodes that cannot be deleted:
| Node | Role |
|---|---|
| Input | Receives the user's chat message |
| Agent | Processes the message using the assigned LLM and any attached sources or tools |
| Output | Returns the agent's response to the chat |
The left panel contains draggable items you can attach to the Agent node.
Configuring the Agent node
Assign an LLM (required to save)
Drag a Chat Setting from the LLMs section in the left panel and drop it onto the LLM drop area on the Agent node. The assigned setting's name appears in the drop area.
To remove it, click the trash icon next to the name. Note: you must always have an LLM assigned — saving without one is blocked with an error toast: "Please drag a chat setting inside Agent before saving the workflow."
Attach sources
Drag a Source from the left panel onto the Agent node to enable document retrieval (RAG) for this assistant. Attached sources are listed on the node.
Attach tools
Drag a Tool (action) from the left panel onto the Agent node. Available tools include:
| Tool | What it does |
|---|---|
| Get Answers in a File | Saves the AI response as a downloadable file (docx, pdf, xlsx, csv, txt) |
| Execute Python Code | Runs Python snippets for calculations or data tasks |
| Get Interactive Visuals in Answers | Generates interactive charts alongside responses |
Set the mode
Use the Mode selector on the Agent node to switch between:
| Mode | Description |
|---|---|
| Agent | Single LLM processes each message — default and recommended for most assistants |
| Orchestrator | Routes queries to specialized sub-agents, each with their own tools and sources |
Orchestrator mode is available in the UI but requires sub-agents to be configured before saving. Saving in Orchestrator mode without sub-agents will return an error. Use Agent mode for standard assistants.
Toolbar actions
| Action | Behaviour |
|---|---|
| Save workflow | Persists all canvas changes. Blocked if no LLM is assigned. |
| Cancel | Returns to the assistant editor without saving. An "Unsaved changes" dialog appears if there are unsaved changes. |
| Delete | Permanently deletes the embedded workflow. A confirmation modal appears. After deletion, you return to the assistant editor with the "+ Add workflow" placeholder. |
| Export | Downloads the workflow as a .json file (named workflow-{name}.json) |
| Import JSON file | Uploads a .json to replace the workflow structure |
| Full Screen | Expands the canvas to fill the browser window |
| New Parameter | Opens the "Add New Variable" popup to define custom input parameters |
Input parameters
Input parameters let you define variables that users fill in before a workflow run. In chat-based assistants, parameters are referenced in the workflow's prompt template using {{parameter name}} syntax.
Add a parameter
Click New Parameter in the toolbar. The "Add New Variable" popup opens.

| Field | Required | Notes |
|---|---|---|
| Name | Yes | Used as the variable name in prompt templates — no spaces |
| Is Required | No | True / False radio (default: False). Stored in the workflow but not visually indicated on the parameter chip. |
| Input Type | No | Controls the input control shown to users (see types below) |
| Placeholder | No | Hint text shown inside the input |
| Value | No | Default value pre-filled for users |
| Description | No | Tooltip or helper text |
Click Create to add the parameter. A chip with the parameter name appears in the Input node's parameters section.
Input types
| Type | Options field shown | Input control |
|---|---|---|
| String | No | Single-line text |
| No | Email input | |
| Password | No | Password (masked) input |
| Number | No | Numeric input |
| Boolean | No | True / False toggle |
| Textarea | No | Multi-line text |
| Select | Yes | Dropdown with your defined options |
| Radio | Yes | Radio button group |
| Checkbox | Yes | Checkbox group |
For Select, Radio, and Checkbox types, an Add Option field appears in the popup — type an option label and click Add to create a chip. Options can be removed individually.
Edit or delete a parameter
- Edit — click the pencil icon on the parameter chip. The "Edit Variable" popup opens, pre-filled with current values.
- Delete — click the trash icon on the parameter chip to remove it.
Save and navigation
After configuring the canvas:
- Click Save workflow — a success toast confirms the save
- Click Cancel to return to the assistant editor
Changes do not take effect in chat until the workflow is saved.